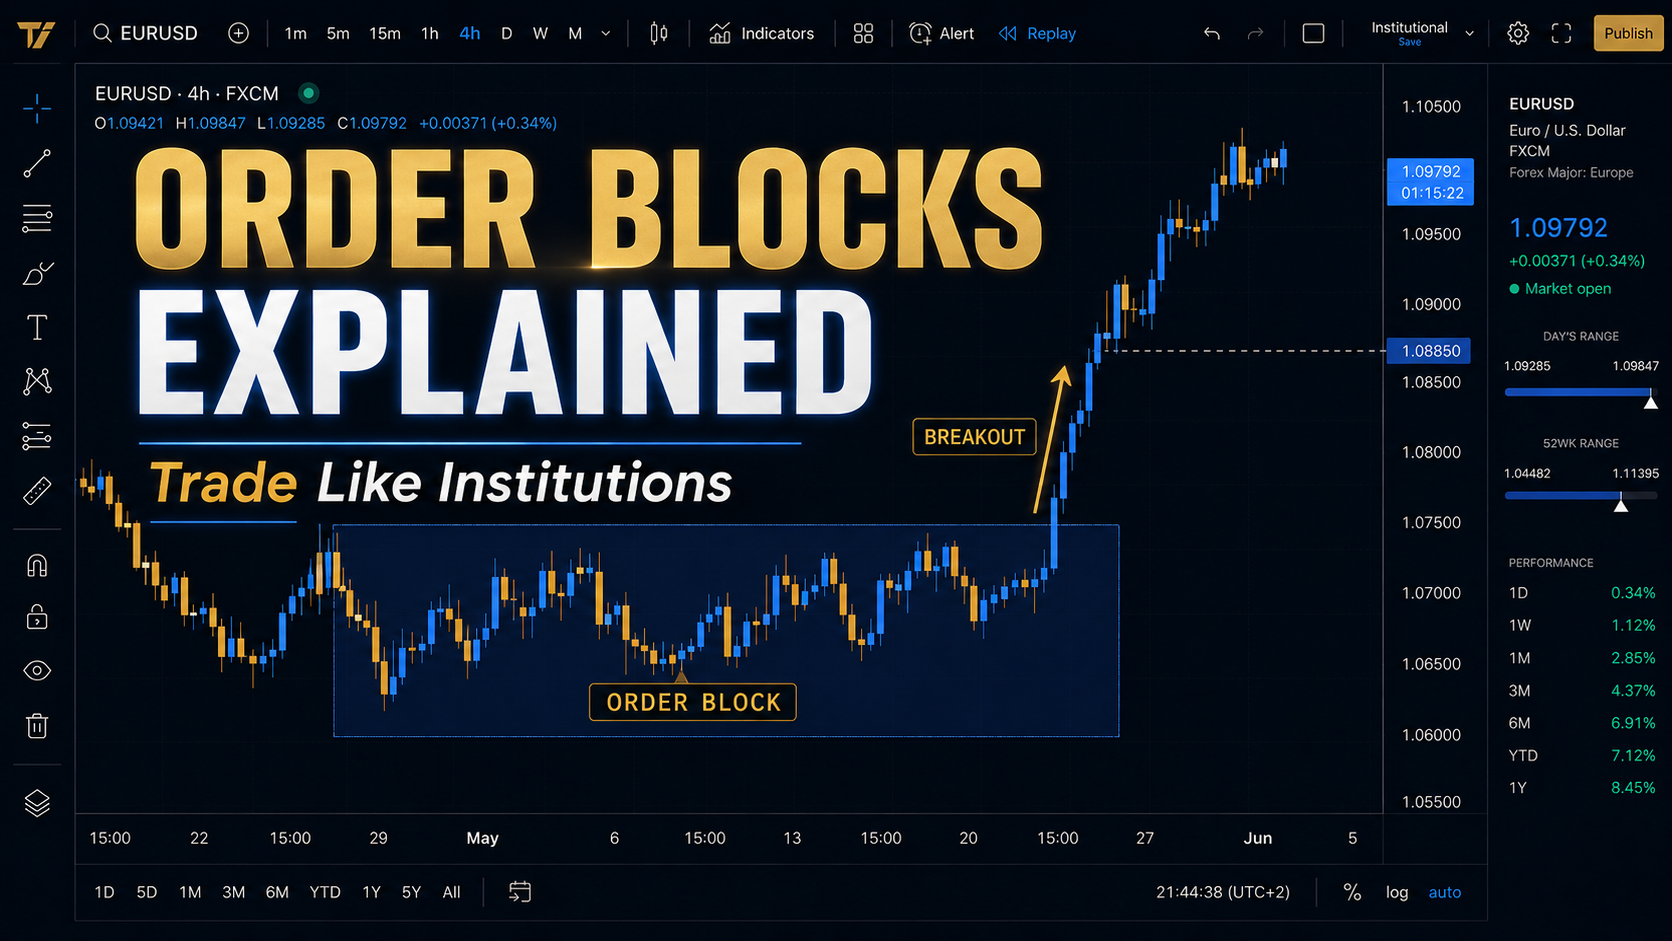
You are scrolling through a chart, and price suddenly reverses from a zone you had marked days earlier. No news, no obvious signal — just a sharp move away from one specific candle. That candle is very likely an order block, and understanding it is one of the fastest ways to start reading price the way institutional desks do.
This guide breaks down what order blocks are, why they form, how to tell a real one from a fake one, and how to build them into an actual trading plan rather than just marking boxes on a chart.
Table of Contents
1. [What Is an Order Block?](#what-is-an-order-block) 2. [Why Order Blocks Form](#why-order-blocks-form) 3. [Bullish vs. Bearish Order Blocks](#bullish-vs-bearish-order-blocks) 4. [How to Identify a Valid Order Block](#how-to-identify-a-valid-order-block) 5. [Order Blocks vs. Support/Resistance vs. Supply & Demand](#order-blocks-vs-comparison) 6. [A Practical Framework for Trading Order Blocks](#trading-framework) 7. [Confluence Factors That Strengthen an Order Block](#confluence-factors) 8. [Common Mistakes Traders Make](#common-mistakes) 9. [FAQs](#faqs) 10. [Conclusion](#conclusion)
What Is an Order Block? {#what-is-an-order-block}
An order block is a specific price zone where large institutional participants — banks, hedge funds, and professional trading desks — are believed to have placed a significant concentration of buy or sell orders. This concept sits at the core of Smart Money Concepts (SMC) and ICT-style trading.
Because institutions trade in size, they cannot fill their entire position at one price without moving the market against themselves. So they accumulate orders across a small range, which shows up on the chart as consolidation right before a strong, directional move.
Key Concept
An order block is not a magic reversal indicator. It is a zone of interest — a footprint left behind by large-volume participants. On its own, it tells you where institutional activity may have occurred, not whether price will definitely react there again.
Why Order Blocks Form {#why-order-blocks-form}
Retail traders often assume price moves are random. In reality, large orders need liquidity to fill, and liquidity tends to pool around obvious highs, lows, and consolidation ranges. This is the mechanical reason order blocks exist.
Here is the general sequence:
1. Price consolidates in a tight range as institutional orders build up. 2. A liquidity sweep often occurs — price briefly pushes past a nearby high or low to trigger stop orders and pending liquidity. 3. Once enough orders are filled, price expands sharply away from that zone. 4. The last candle before that expansion becomes the order block.
This is also why order blocks are frequently discussed alongside liquidity sweeps and fair value gaps — they tend to appear together as part of the same institutional footprint.
Bullish vs. Bearish Order Blocks {#bullish-vs-bearish-order-blocks}
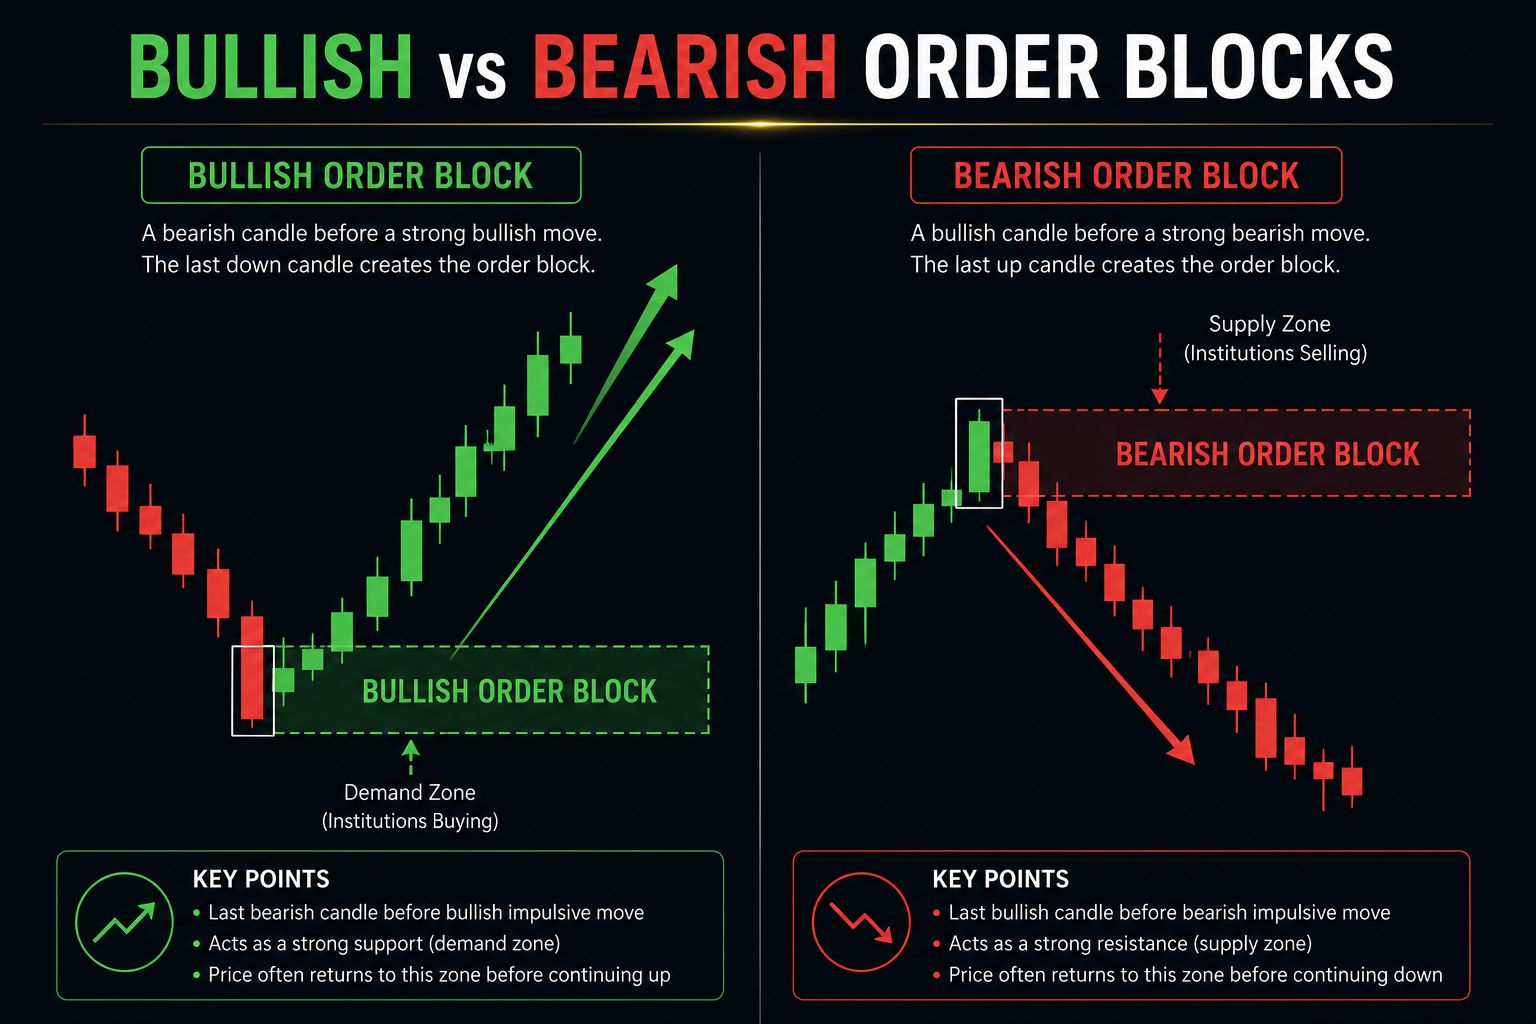
Order blocks come in two directional types, and mixing them up is one of the most common beginner errors.
Bullish Order Block This is the last down-close (bearish) candle before a strong upward move. It marks where sellers were absorbed by larger buy-side interest, and it's typically treated as a demand zone for future long entries.
Bearish Order Block This is the last up-close (bullish) candle before a strong downward move. It marks where buyers were absorbed by larger sell-side interest, and it's typically treated as a supply zone for future short entries.
The core trading logic is simple: trade with the order block, not against it. Bullish order blocks are watched for long setups; bearish order blocks are watched for short setups.
How to Identify a Valid Order Block {#how-to-identify-a-valid-order-block}
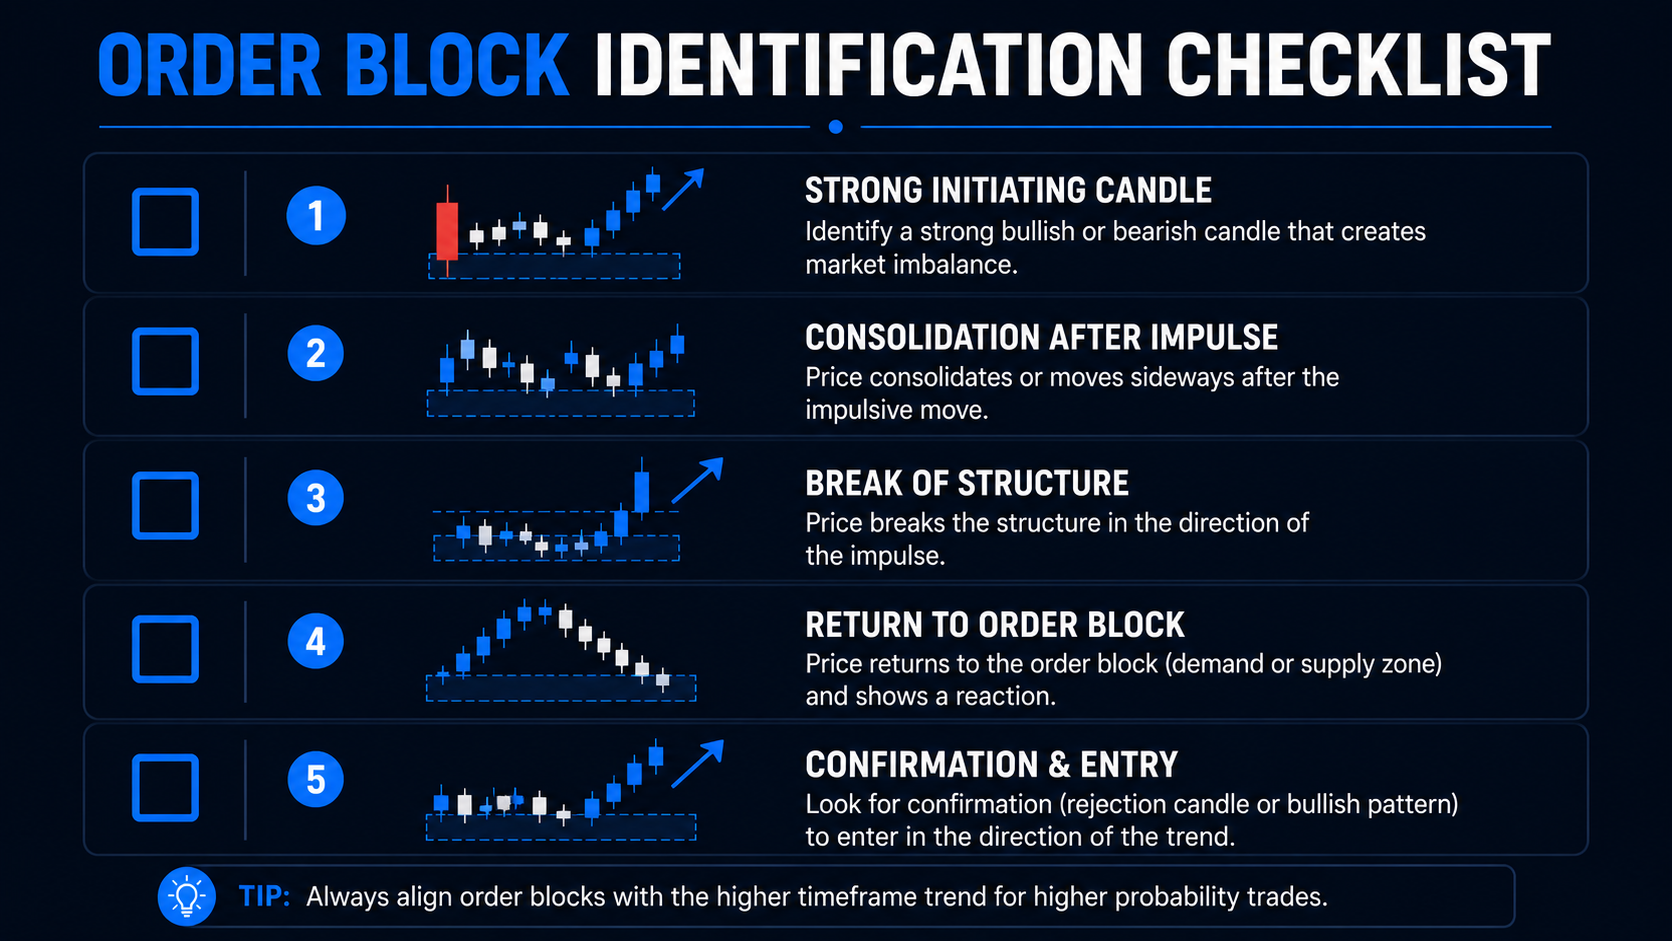
Not every candle before a move qualifies as a strong order block. Use this checklist to filter out weak, low-probability zones.
- Strong displacement: The move away from the zone should be impulsive, not gradual, ideally breaking recent market structure.
- Clean candle body: Favor order blocks with a large body and small wicks — this suggests decisive institutional participation rather than indecision.
- Location matters: Order blocks near key highs/lows or after a liquidity sweep carry more weight than ones found in the middle of a range.
- Untested zones: A fresh order block that price hasn't returned to yet is generally considered higher probability than one already retested multiple times.
- Higher timeframe context: An order block on the 4H or Daily chart holds more significance than the same pattern on a 1-minute chart.
Order Blocks vs. Support/Resistance vs. Supply & Demand {#order-blocks-vs-comparison}
These three concepts overlap, and traders often use the terms loosely. Here's how they actually differ.
| Concept | What Defines the Zone | Basis of the Theory | Typical Timeframe Use | |---|---|---|---| | Order Block | Last opposing candle before a strong institutional move | Institutional order flow / footprint | Works on any timeframe, most reliable on HTF | | Support/Resistance | Price level tested multiple times by the crowd | Collective trader psychology and memory | Works best on higher timeframes | | Supply & Demand Zone | Broader consolidation area before an imbalance move | Retail-friendly version of order flow theory | Common on swing and day trading timeframes |
In short: support/resistance is about crowd behavior, supply/demand is a broader zone-based version of the same idea, and order blocks attempt to pinpoint the exact candle tied to large-participant activity.
A Practical Framework for Trading Order Blocks {#trading-framework}
Marking order blocks is the easy part. Trading them consistently requires a defined process, similar to the systematic approach discussed in our guide on overcoming analysis paralysis in trading.
Step 1: Mark higher timeframe structure first. Identify the trend and key order blocks on the 4H or Daily chart before zooming into lower timeframes.
Step 2: Wait for price to return to the zone. Do not chase the initial move. The trade opportunity is on the retest, not the breakout itself.
Step 3: Look for a confirmation signal. This could be a lower-timeframe shift in structure, a rejection candle, or a momentum shift as price enters the zone.
Step 4: Set stop loss beyond the order block. Place stops just outside the zone — below a bullish order block or above a bearish one — so a small wick doesn't stop you out prematurely.
Step 5: Target the next liquidity point. Reasonable targets are the next swing high/low, opposing order block, or a fixed risk-reward ratio of at least 1:2.
Confluence Factors That Strengthen an Order Block {#confluence-factors}
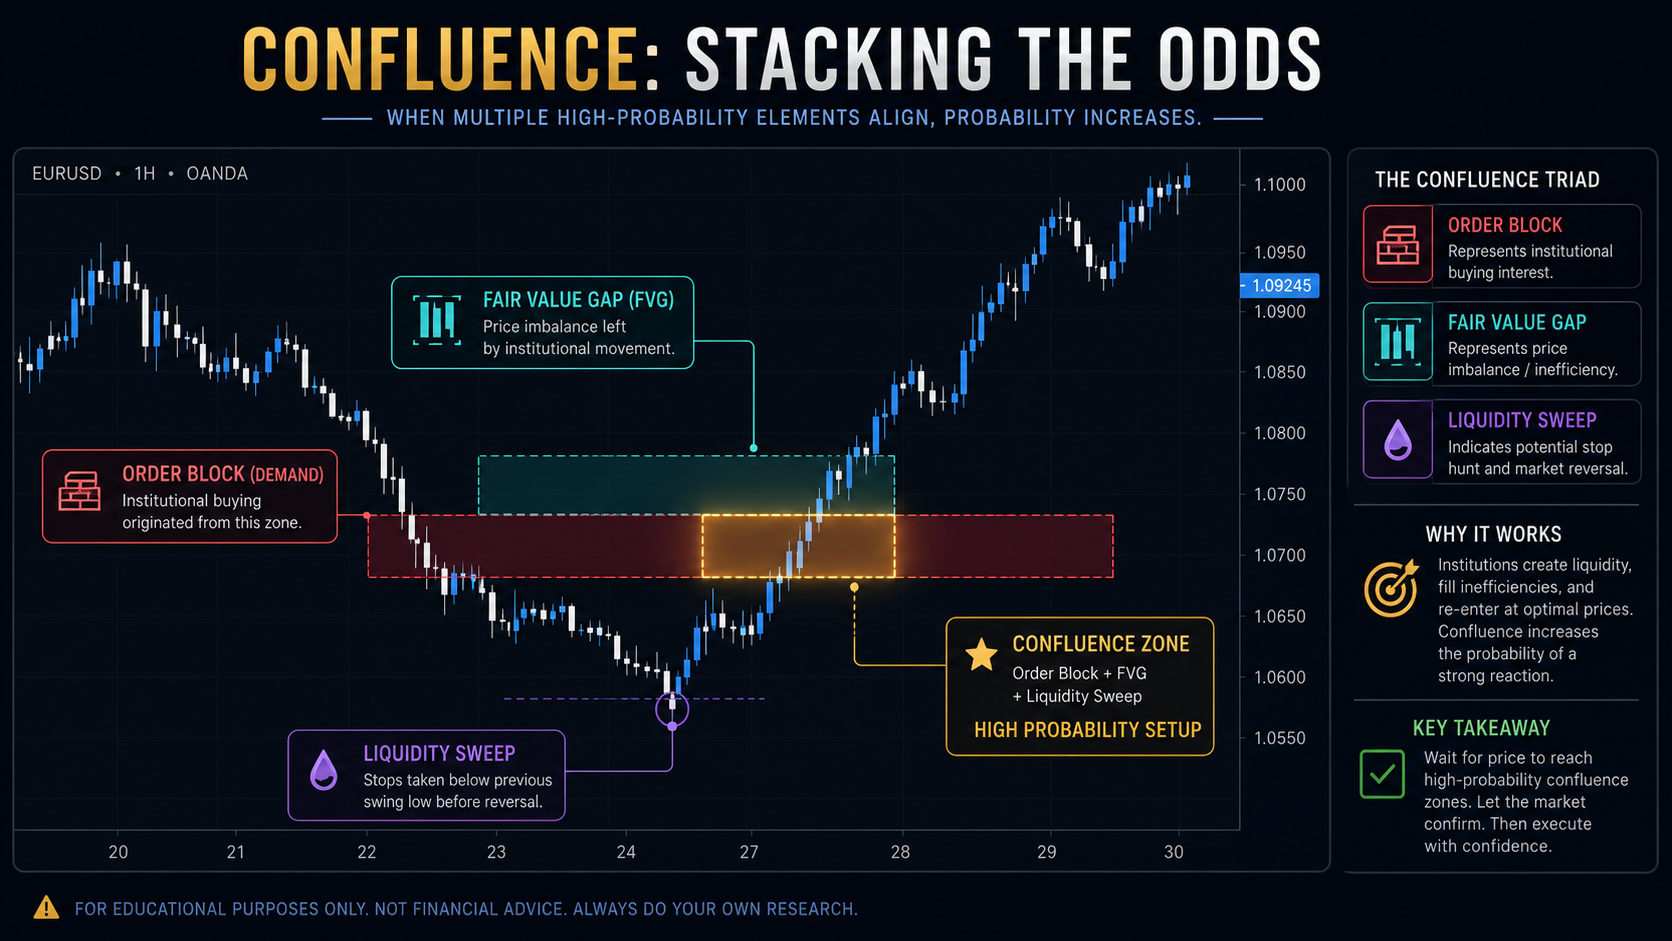
An order block by itself is only a probability zone. Combining it with other tools filters out weak setups and improves consistency.
- Volume Spread Analysis (VSA): Rising volume into the order block on the original move adds weight to the zone. Our VSA trading guide covers this in more depth.
- Fair Value Gaps (FVG): An order block that lines up with an unfilled imbalance nearby increases confluence.
- Market Structure Shift: A break of structure on a lower timeframe as price enters the zone adds confirmation.
- Liquidity Sweeps: Order blocks formed right after a stop-hunt above/below a swing point tend to perform better.
- Broader Smart Money Concepts: For a full framework connecting these ideas, see our Smart Money Concepts guide.
Pro Tip
Treat confluence like a scorecard, not a single yes/no filter. The more of these factors align at one zone, the higher the probability — but no combination guarantees the outcome.
Common Mistakes Traders Make With Order Blocks {#common-mistakes}
Even experienced traders fall into these traps repeatedly.
- Marking every candle as an order block. Not every consolidation-then-move qualifies; be selective and prioritize displacement quality.
- Ignoring higher timeframe bias. A bullish order block on a 5-minute chart means little if the daily trend is strongly bearish.
- Entering without confirmation. Blindly buying the moment price touches a zone skips the confirmation step and increases risk.
- Overcrowding the chart. Marking dozens of old, already-tested order blocks creates visual noise instead of clarity.
- Treating order blocks as guaranteed reversals. They are probability zones, similar in nature to support and resistance levels, not certainties.
FAQs {#faqs}
Q: Are order blocks the same as supply and demand zones? They are closely related but not identical. Supply and demand zones are typically broader areas, while order blocks aim to isolate the specific candle tied to institutional order flow.
Q: Do order blocks work on all timeframes? Yes, technically, but order blocks on higher timeframes (4H, Daily, Weekly) are generally considered more reliable than those on very low timeframes like 1-minute charts.
Q: What happens if price breaks through an order block? If price closes clearly beyond the zone with strong momentum, the order block is usually considered invalidated or "mitigated," and traders typically look for the next relevant zone instead.
Q: Can I trade order blocks without knowing Smart Money Concepts? You can, but understanding the broader SMC framework — liquidity, market structure, and fair value gaps — makes order block trading significantly more accurate.
Q: What is the best confirmation signal on an order block retest? There's no single "best" signal, but a lower-timeframe market structure shift combined with rejection wicks is one of the more commonly used confirmations among SMC traders.
Conclusion {#conclusion}
Order blocks give traders a structured way to think about where institutional interest may re-enter the market. They are not a standalone signal, and treating them as one is where most losses come from.
Used correctly — with higher timeframe context, confirmation signals, and proper risk management — order blocks become one part of a broader, systematic trading process rather than a shortcut to certainty.
Start small: mark only the highest-quality order blocks on your charts this week, wait for confirmation before entering, and track the results in your trading journal.
---
Further Reading (External Resources):
Related Guides on TradingAnalysis.ai:
- Smart Money Concepts: The Complete Guide
- Volume Spread Analysis (VSA) Explained
- Support and Resistance Trading Strategies
- Analysis Paralysis in Trading: How to Stop Overthinking