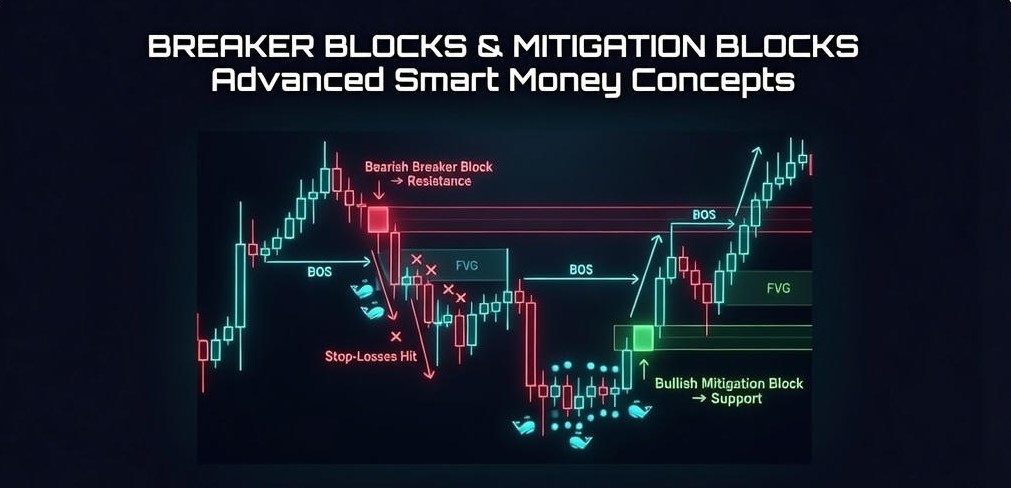
# Breaker Blocks & Mitigation Blocks: Unveiling Advanced Smart Money Concepts
In the intricate world of financial markets, understanding the footprints of institutional money – often referred to as Smart Money – is paramount for gaining a discernible edge. While many traders are familiar with foundational Smart Money Concepts (SMC) like Order Blocks, there exist more nuanced, yet equally powerful, structures that often go overlooked: Breaker Blocks and Mitigation Blocks. These advanced concepts provide a deeper insight into how supply and demand dynamics shift, offering sophisticated entry and exit points for discerning traders.
This guide will dissect Breer and Mitigation Blocks, revealing their underlying logic, identification criteria, and practical application in various trading scenarios. By mastering these concepts, you can elevate your price action analysis, refine your trading strategies, and align yourself more closely with the flow of institutional capital.
Are you ready to transcend the basics and unlock the hidden power of advanced SMC?
Table of Contents
- [Understanding the Genesis: Order Blocks & Market Structure](#understanding-the-genesis-order-blocks--market-structure)
- [What is a Breaker Block? Identifying Institutional Traps](#what-is-a-breaker-block-identifying-institutional-traps)
- [Trading with Breaker Blocks: Precision Entries and Confluence](#trading-with-breaker-blocks-precision-entries-and-confluence)
- [What is a Mitigation Block? Reclaiming Unfilled Orders](#what-is-a-mitigation-block-reclaiming-unfilled-orders)
- [Trading with Mitigation Blocks: Strategic Re-entries](#trading-with-mitigation-blocks-strategic-re-entries)
- [Breaker Blocks vs. Mitigation Blocks: Key Distinctions](#breaker-blocks-vs-mitigation-blocks-key-distinctions)
- [Integrating Breakers and Mitigation into Your Trading Plan](#integrating-breakers-and-mitigation-into-your-trading-plan)
- [Conclusion: Mastering the Nuances of Smart Money](#conclusion-mastering-the-nuances-of-smart-money)
Understanding the Genesis: Order Blocks & Market Structure
Before delving into Breaker and Mitigation Blocks, it's crucial to solidify our understanding of their foundational elements: Order Blocks and Market Structure. These are the building blocks upon which more advanced SMC concepts are constructed.
Order Blocks Revisited
An Order Block represents a specific candlestick (or group of candlesticks) where institutional smart money is believed to have placed a significant volume of orders, causing an impulsive move in price. These blocks signify areas of high liquidity where supply or demand imbalances were created.
:::key-concept Bullish Order Block: The last down-candlestick before an aggressive move up that breaks market structure.
Bearish Order Block: The last up-candlestick before an aggressive move down that breaks market structure. :::
Market Structure Breakdown
Market structure refers to the trending nature of the market, characterized by higher highs and higher lows in an uptrend, and lower highs and lower lows in a downtrend. A Break of Market Structure (BOS) or a Change of Character (CHoCH) is a critical event that signals a potential shift or continuation in the prevailing trend.
:::tip Always analyze market structure on multiple timeframes to gain a comprehensive understanding of the larger trend context. A change in character on a lower timeframe might be a mere retracement on a higher timeframe. :::
What is a Breaker Block? Identifying Institutional Traps
A Breaker Block emerges from a specific sequence of events that often traps early participants on the wrong side of a significant price move. It represents a level where institutions initially injected liquidity for a potential move, only for that attempt to fail, leading to a violent reversal.
The Anatomy of a Breaker Block
1. Swing High/Low Formation: Price makes a clear swing high (in a potential bearish breaker scenario) or a swing low (in a potential bullish breaker scenario). 2. Initial Order Block: An Order Block forms around this swing high/low, suggesting institutional interest in a particular direction. 3. Liquidity Sweep/Displacement: Price initially moves in the direction suggested by the Order Block, often sweeping liquidity above a swing high or below a swing low. This move then fails to maintain momentum and aggressively reverses. 4. Break of Market Structure (BOS): The aggressive reversal breaks a significant low (for a bearish breaker) or a significant high (for a bullish breaker), signaling a decisive shift in market sentiment. 5. The Breaker Block: The candlestick (or group of candlesticks) that formed just before the liquidity sweep and subsequent break of market structure becomes the Breaker Block. It's essentially a failed Order Block that now acts as strong resistance or support upon retest.
:::example Bearish Breaker Block Scenario: 1. Price is generally trending upwards, creating higher highs and higher lows. 2. A swing high forms, followed by a bullish Order Block. 3. Price pushes slightly above the swing high, potentially trapping bullish traders (liquidity sweep). 4. Instead of continuing higher, price aggressively reverses, breaking the most recent significant swing low (BOS). 5. The bullish Order Block that failed to hold and led to the BOS now becomes a Bearish Breaker Block. When price returns to this block, it often acts as strong resistance for selling opportunities. :::
Why Breaker Blocks Form
Breaker Blocks reveal instances where institutions attempted to push price in one direction, absorbing liquidity, but then encountered stronger opposing forces. These levels become significant because smart money has pre-existing orders at these prices that were not fully executed or were executed at a disadvantage. When price returns to this
level, those unfulfilled orders or positions seeking mitigation often get triggered, leading to a strong reaction.
:::key-concept A Breaker Block is a failed Order Block. What was intended to be support often becomes resistance (in a bearish breaker), and what was intended to be resistance often becomes support (in a bullish breaker) once the market structure breaks. :::
What is a Mitigation Block? Rectifying Erroneous Institutional Positions
While Breaker Blocks represent a failed attempt at market control, Mitigation Blocks speak to institutions actively managing and exiting unfavorable positions. They are areas where "smart money" has taken a loss on initial positions and seeks to mitigate that loss by getting out at a better price point than their initial entry.
The Anatomy of a Mitigation Block
1. Initial Price Move: Price makes a strong move in one direction (e.g., upward). 2. Institutional Entry Against Trend: Institutions may enter positions against the prevailing short-term trend (e.g., selling near a swing high in an uptrend), anticipating a reversal or simply trying to absorb liquidity. 3. Position Trapped/Loss: Price continues to move strongly in the initial direction, pushing past the institutional entry points, leaving them with losing or "trapped" positions. 4. Major Reversal/Market Structure Shift: A significant reversal occurs, often accompanied by a Break of Market Structure (BOS) in the opposite direction. 5. The Mitigation Block: The cluster of candlesticks where the institutions initially entered their losing positions (or the range where they were trapped) becomes the Mitigation Block. When price revisits this area, institutions use it as an opportunity to close out their unfavorable positions at a more advantageous price, thereby mitigating their losses. This often causes price to respect the block and reverse again.
:::example Bullish Mitigation Block Scenario: 1. Price is in a strong downtrend. 2. Institutions might attempt to buy near a swing low, expecting a bounce or reversal. 3. Price breaks significantly lower, invalidating their entry and leaving their buy positions in a loss. 4. Eventually, price finds a bottom and aggressively reverses, breaking significant resistance (BOS to the upside). 5. As price retraces back up towards the area where institutions initially placed their losing buy orders, that area becomes the Bullish Mitigation Block. When price enters this block, those institutions use the opportunity to close their losing buy positions. This selling pressure often pushes price lower again, making the block act as resistance for shorting opportunities. :::
Why Mitigation Blocks Form
Mitigation Blocks arise from the need of large institutional players to manage risk and recover from adverse price moves. Unlike retail traders who might cut losses quickly, institutions often have massive positions that cannot be exited all at once without significantly impacting the market. They wait for price to return to a more favorable level—where their initial erroneous positions were taken—to exit or reduce their exposure, impacting price action upon retest.
:::key-concept A Mitigation Block is fundamentally about institutions exiting losing positions. Their action of selling (to close long positions) or buying (to close short positions) creates reactions at these levels. :::
Key Differences & Similarities: Breaker vs. Mitigation Blocks
While both Breaker and Mitigation Blocks are significant institutional price levels formed after a shift in market structure, understanding their subtle differences is crucial for effective trading.
| Feature | Breaker Block | Mitigation Block | | :------------------------- | :------------------------------------------------------- | :----------------------------------------------------------- | | Origin | Failed Order Block or initial move that traps retail/smart money. | Area where institutions entered losing positions (against the subsequent trend). | | Primary Institutional Action | Re-engaging with pre-existing orders or reversing an initial failed attempt. | Exiting or reducing existing losing positions to mitigate losses. | | Market Structure | Always preceded by a liquidity sweep (manipulation) and subsequent BOS. | Preceded by price moving significantly against initial institutional entry, then a BOS. | | Candlestick Location | The last up/down candle before the liquidity sweep and BOS. | The range or candle where institutions placed their losing orders. | | Purpose on Retest | Reversal due to strong institutional intent to move price in the new direction. | Reversal due to institutions closing out losing positions. |
:::tip Both Breaker and Mitigation Blocks represent zones where "smart money" has a vested interest, making them high-probability areas for price reactions. Always look for confluence with other SMC concepts like Fair Value Gaps (FVGs) within or near these blocks. :::
How to Trade Breaker and Mitigation Blocks
Trading these advanced SMC concepts requires precision, patience, and strict risk management.
Entry Strategies
1. Confluence with FVG: Look for a Fair Value Gap (FVG) within or immediately adjacent to the Breaker/Mitigation Block. This indicates an imbalance that institutions may seek to fill upon retest. 2. Lower Timeframe Confirmation: As price approaches the block, drop to a lower timeframe (e.g., 5-minute for a 1-hour block). Look for a change of character (ChoCH) or a small break of structure in the direction of your anticipated trade within the block itself. 3. Partial Entry: Consider entering with a partial position upon the first touch of the block, and then adding if lower timeframe confirmation occurs. 4. Limit Orders: Place limit orders at the top/bottom of the block, or around the 50% equilibrium point of the block.
Stop Loss Placement
- Outside the Block: Place your stop loss slightly beyond the protective extreme of the breaker/mitigation block. For a bearish block, this would be above the high of the block; for a bullish block, below the low.
- Consider Volume/Volatility: Adjust your stop loss width based on the volatility of the asset and the timeframe you are trading.
Take Profit Targets
1. Liquidity Targets: Identify obvious liquidity pools (swing highs/lows, previous highs/lows) in the direction of your trade. 2. Fair Value Gaps: Target opposing Fair Value Gaps that need to be filled. 3. Previous Order Blocks/Breakers: Take profit at the next significant institutional price action level. 4. Risk-to-Reward Ratio: Always aim for a minimum 1:2 or 1:3 risk-to-reward ratio.
:::warning Never trade these blocks in isolation. Always confirm with prevailing market structure, higher timeframe direction, and other SMC tools. Trading against the higher timeframe trend using a Mitigation Block is inherently riskier than trading with it. :::
Real-World Examples & Practice
(Self-directed learning activity for the reader)
To truly master Breaker and Mitigation Blocks, hands-on practice is essential.
1. Open your Charts: Go to your preferred trading platform (e.g., TradingView). 2. Select an Asset: Choose a liquid asset like EURUSD, SPX500, or BTCUSD. 3. Higher Timeframe Analysis: Start on a higher timeframe (e.g., Daily, 4-hour) to establish the overall market direction and key structural points. 4. Identify Potential Blocks: Scroll back through historical data and look for:
5. Mark Them Up: Use drawing tools to clearly mark the identified blocks. 6. Observe Price Action: Watch how price reacted (or failed to react) to these blocks upon retest. 7. Backtest Your Hypothesis: For every block found, ask: "Would I have entered here? Where would my stop loss be? What would my target be?" 8. Look for Confluence: Did FVGs align with the blocks? Did lower timeframe confirmation occur?
- Breaker Blocks: Price sweeps liquidity, then aggressively breaks market structure. Identify the candle before the sweep that turned into the breaker.
- Mitigation Blocks: Price makes an initial move, then reverses sharply, followed by a retest of the area where the initial losing positions might have been taken.
:::tip Practice on multiple timeframes. A Breaker Block on the 15-minute chart might be a smaller reaction within a larger Breaker Block on the hourly chart. Understanding this fractal nature is key. :::
Conclusion
Breaker Blocks and Mitigation Blocks are two of the most powerful and often overlooked concepts in Smart Money Concepts trading. They offer a rare glimpse into the strategic maneuvers of institutional players—whether it's reversing a failed market push (Breaker Block) or skillfully exiting unfavorable positions (Mitigation Block).
By diligently studying their anatomy, understanding the psychology behind their formation, and practicing their identification on your charts, you can develop a robust edge in anticipating significant market reversals and continuations. Remember that successful trading isn't about memorizing patterns but understanding the underlying market dynamics that create them. Integratimg these concepts into your trading framework, combined with sound risk management, will significantly enhance your ability to navigate the markets.
Start practicing now! Load up your charts, rewind the clock, and challenge yourself to find these hidden zones of institutional activity. The more you identify them, the clearer the market's true intentions will become. Happy trading!
Advanced Strategies and Nuances
Once you've mastered the basics of identifying Breaker and Mitigation Blocks, you can begin to integrate them into more sophisticated trading strategies.
Combining with Order Blocks and FVGs
Breaker and Mitigation Blocks rarely exist in isolation. Their power is often amplified when they align with other SMC concepts.
:::key-concept Confluence is King: The more SMC elements (Order Blocks, FVGs, Liquidity Zones, Imbalances) that align with a potential Breaker or Mitigation Block, the higher the probability of a strong reaction. :::
- Breaker Block + FVG: A Breaker Block that forms and leaves behind a Fair Value Gap (FVG) within or immediately after its formation often signals an even stronger directional bias. Price frequently retests the Breaker Block and then fills the FVG before continuing in the new trend direction.
- Mitigation Block + Order Block: A Mitigation Block might coincide with or overlap an existing Order Block. This reinforces the area as a significant institutional level where large orders were placed and potentially need to be re-engaged or exited.
- Breaker Block & Liquidity: Often, a Breaker Block forms after sweeping significant external liquidity (e.g., old highs/lows, trendline liquidity). This sweep acts as the initial manipulation that precedes the market structure break and subsequent retest of the Breaker.
Refined Entry and Exit Techniques
While the basic retest provides an entry point, more precise techniques can be employed.
- Confirmation Entries: Instead of simply entering at the first touch of the block, wait for lower timeframe confirmation. On a 5-minute chart, look for a market structure shift in your favor or the formation of a small Order Block/FVG at the Breaker/Mitigation Block level.
- Partial Entries: Scale into positions. Take an initial smaller position on the first touch and add to it if confirmation appears.
- Targeting Liquidity: Breaker Blocks often lead to moves towards new liquidity pools (e.g., prior swing highs/lows, equal highs/lows). Mitigation Blocks might lead to moves back towards previous imbalance fills or liquidity voids.
- Stop Loss Placement: For Breaker Blocks, a stop loss is typically placed just beyond the extreme of the candle that formed the block or a few pips beyond the entire block structure. For Mitigation Blocks, placing the stop loss beyond the failed high/low that defines the mitigation area is common.
:::warning Never trade solely based on a single Breaker or Mitigation Block. Always consider the overall market context, higher timeframe bias, and confluence with other factors. :::
Common Mistakes and How to Avoid Them
Even experienced traders can fall into traps when using these concepts.
1. Misidentifying Blocks:
- Breaker Block: Ensuring there's a clear liquidity sweep followed by a market structure break is crucial. A simple shift in trend without the initial sweep is not a Breaker.
- Mitigation Block: The block must be formed by an initial move that failed to continue, followed by a sharp reversal through the area where the initial move originated.
- Solution: Go back to the definitions. Practice identifying them on historical charts with meticulous attention to detail.
2. Ignoring Higher Timeframe Bias: Trading a bullish Breaker Block against a strong bearish daily trend is often a low-probability setup.
- Solution: Always align your trades with the higher timeframe direction. Use lower timeframe blocks for entry into the higher timeframe trend.
3. Lack of Confluence: Relying on a single Breaker or Mitigation Block without any other supporting evidence.
- Solution: Seek confluence with FVGs, Order Blocks, liquidity zones, and structural levels. The more reasons you have for a trade, the better.
4. Poor Risk Management: Over-leveraging or placing stops too tight or too wide.
- Solution: Always define your stop loss and take profit before entering. Risk only a small percentage of your account per trade (e.g., 0.5% - 1%).
5. Emotional Trading: Chasing trades or revenge trading after a loss.
- Solution: Stick to your trading plan. If a setup doesn't meet your criteria, wait for the next one. Patience is paramount.
Conclusion
Breaker Blocks and Mitigation Blocks are sophisticated tools within the Smart Money Concepts framework that offer profound insights into institutional behavior. They represent areas where the "smart money" has either reversed a failed maneuver (Breaker Block) or carefully managed their exposure from unfavorable positions (Mitigation Block).
By
- Understanding their anatomy: The specific price action leading to their formation.
- Deciphering the psychology: The institutional intent behind their creation.
- Practicing identification: Diligently spotting them on your charts across various timeframes.
- Integrating with confluence: Combining them with other SMC elements like FVGs and Order Blocks.
- Employing disciplined risk management: Protecting your capital on every trade.
You can significantly enhance your ability to anticipate significant market turns and continuations with higher precision. These concepts move beyond simple pattern recognition, delving into the underlying "why" behind market movements, equipping you with a more strategic and informed approach to trading.
:::tip Your journey to mastery begins now! Don't just read about these concepts; apply them. Load up your charts, rewind time, and actively search for Breaker and Mitigation Blocks. Mark them, observe their reactions, and critically analyze failed setups as much as successful ones. The more screen time you dedicate to this practice, the more intuitive these powerful concepts will become, transforming your understanding of market dynamics. :::
Happy trading, and may your blocks always be clear!